
Specifications
| Parameter | Value |
|---|---|
| Input | 100-125 VAC, 7A, single phase, 50-60Hz |
| Output | 0 - 300 VDC, up to 3A |
| Short Circuit Tolerance | Indefinite |
| Fusing | Input & Output: 12A, 450V |
| Power Switch | 50A thermal circuit breaker |
| Battery Switch | 15A, 250VDC |
| Weight | 7 pounds |
| Operating Temperature | 0 - 40C [32 - 105F] ambient |
| Humidity | Noncondensing |
| Charge Stop | On reaching set level +/- 1V or reverse battery connection |
| Base Price | $1,000 |
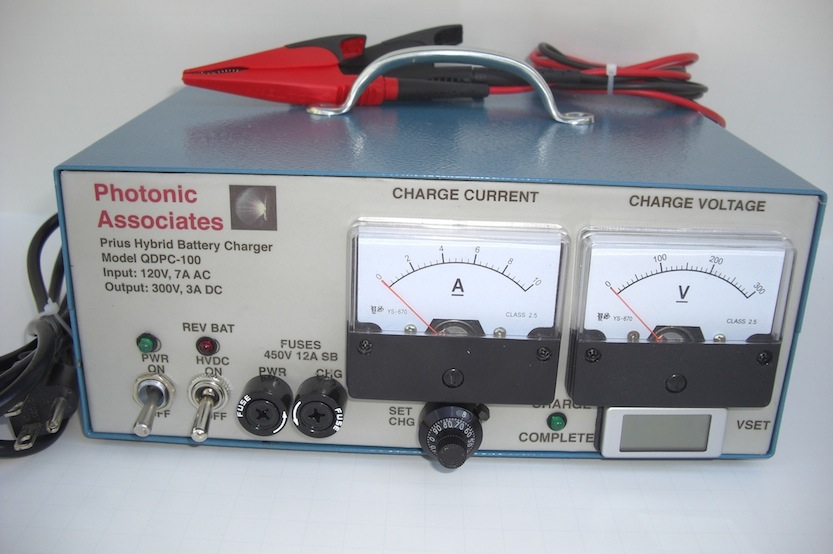
Figure 1.The QDPC-100 Prius Hybrid Charger (August, 2012)
Intended Application
For Prius car repair shops, similar high voltage battery applications such as high voltage diesel hybrids, not the consumer market. For the Prius, there are two situations for which this device is designed: 1) A Prius Hybrid has been left idle for a period so long that the main battery has discharged to a level that will no longer start the engine, 2) A Prius Hybrid was driven on the battery after fuel is depleted, to the same result. At the present time, the consequence in most Prius shops is installing a new HV battery, because most shops don’t have an appropriate battery charger.
How it Works
The analog voltmeter on the front panel shows the voltage at the battery, whether it’s being charged or not. If it increases a lot when charging, the battery may have a fault which results in an internal resistance much larger than the usual 0.55 ohms, which usually would give at most a 1.5 volt change when charging begins. If internal resistance is much larger, there will be a larger change.
The analog ammeter shows charge current going to the battery. The small DVM (digital voltmeter) below the analog voltmeter shows a number corresponding to the ultimate voltage you set with the Vset knob. It is just a marker, not a multiple of the absolute set voltage. Fig. 2 shows the measured relationship. You need to use this graph to use the charger properly.
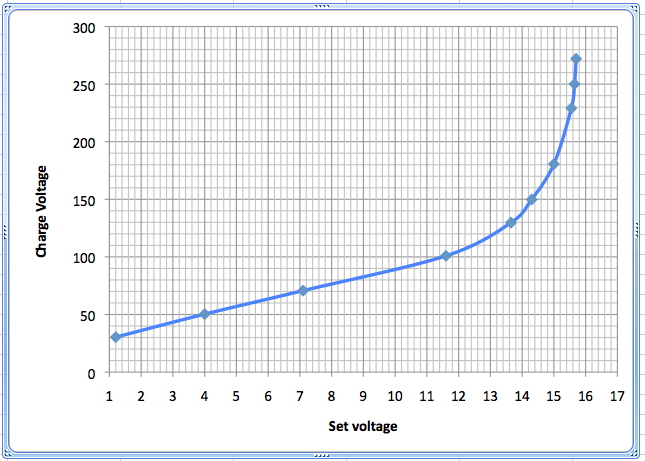
Figure 2. Stop charge voltage vs. DVM reading
Input and output are protected with 12-A slow blow fuses. Although deceptively small, the main power switch is a 50-amp circuit breaker. All components in the high voltage circuit are rated for 800 volts or higher; the main rectifier is rated at 2000 volts, 35A. Charging cables are rated 10-A, 1,000V.
Operating Sequence
It is important to follow this sequence. Although damage will not always occur when it is not followed, proper operation may be compromised.
1) Make sure front panel switches are in the “off” position.
2) Plug the device in to 120VAC 60Hz single phase power.
3) Turn on the main power switch. Wait a second. The fan will start, and the internal sensing circuits will come to life.
4) Attach the Prius battery. The voltmeter will register battery voltage. If the alarm sounds and the red panel light comes on bright continuously, you have the battery connected backward. In normal operation, the red light may be on dimly.
5) Turn the “Vset” knob clockwise until the buzzer and the “charge complete” green light goes out.
6) Now, slowly turn the knob counterclockwise until the desired set voltage is reached (using Figure 2). What you set must be larger than the indicated voltage on the analog panel meter, or nothing will happen. This is quite sensitive near the level at which charging stops.
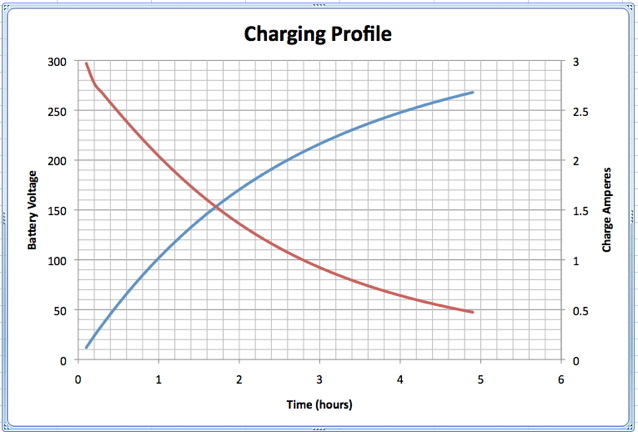
Figure 3. Charge voltage and current vs. time
7) Turn on the “HVDC” switch. Charging will commence and charge current will be indicated. The device can operate into a dead short indefinitely, but there is no point in doing this if the battery is not charging. Estimated charge time for an otherwise healthy but discharged battery is about 4 hours to full charge [Figure 3]. In the case of Prius Hybrids, most of them will start well below full charge.
For Prius Hybrid batteries, the nominal voltage varies, a lot:
2000 Gen 2: 274 V
2004 Gen 3: 202 V
2010 Gen 4: 202 V
Do not overcharge. However, if the nominal charge voltage is 202V, for example, the operating range is 100 to 235V during the normal charge/discharge cycle in operation in the car.
The charge rate is deliberately low so that there is little chance of overheating the battery. Compared to the maximum charge/discharge rate of a Prius cell in normal operation (Charge +40, Discharge -90 amps), 3A is insignificant, about 0.23 watts per normal cell at maximum charge rate. However, please note that if the battery is completely dead and will not take a charge, it could be overheated if you leave it charging at 3A for hours. Also, experience shows that some batteries which have not held a charge for a long time will have much lower capacity than normal, and reach 200 or 300V in seconds. You have to watch the charge process at least for the first five minutes and check on it every thirty minutes after that to be sure problems aren’t developing.
8) When the set charge is reached, the green “charge complete” light will come on, the buzzer will sound and the red light may illuminate in a momentary fashion. Charging will stop and start cyclically.
9) If you’re in a hurry, turn off the “HVDC” switch. But note that its life will be much longer if you stop charge by turning the Vset knob further to the left until the buzzer and green light are on continuously. Unlike the contacts in the switch, the SCR inside doesn’t make a spark.
10) Turn off the main power switch and the HVDC switch.
11) Disconnect the charging cables and short them together for safety.
Unique Capabilities
Other chargers use transformers (heavy and hot) or high frequency IGBT’s [Insulated gate, bipolar transistors]. If the IGBT fails, nothing stands between the battery with its 30kW output and the power mains. Our charger provides an automatic limit on the charge voltage that can be attained, guarding against battery fires if the device is left unattended.
Safety
Never turn the device on without the charging leads being connected to something. It’s OK to have them shorted together, although there’s no point in leaving the power on when they are shorted.
Always wear suitable high-voltage protective gloves whenever you are handling the high-voltage leads and clips or working near the battery.
Never change fuses while the main power switch is on.
Keep the device away from water, humidity and steam.
Keep the device in a well-ventilated space. If the fan ever becomes plugged with lint, etc., use a gentle air stream to clear it. If the fan stops, do not use the device. Return it for repair within warranty.
There is an internal resistor which automatically discharges the capacitors in the unit after the power is turned off. The only way you will come in contact with high voltage generated by the unit after power is turned off is if the HVDC switch is left on, the charging cables are not shorted together, and that only for sixty seconds.
To place an order for the charger, first contact us at 505-466-3877 or the email address below.
When we have agreed on delivery and you are sure you want to buy - -
1: If you are tax exempt, Click this Link
2: If you are not tax exempt, Click this Link
We welcome:
Your interest, opinions and questions. Send them to crphipps@photonicassociates.com